3.19.2014

Craft for Profit: Professional Use of Color

Tight Color Palettes Increase Craft Professionalism

Want to make the most of your crafting so that you can earn the most return on your efforts? Be professional with colors, and you'll see a dramatic impact on your craft business.

Today, we know that color is the best means of drawing attention to any media. Any media; this has some effects on us as crafters that many people don't take into consideration. Media means anything that we use to present information, make sales, and gain customers. It includes the pictures we take, the graphics we use, and the items inside both of those things.


This is a topic that I've written on and held classes about for years, and I am still disappointed to find that while the creativity of crafters knows no bounds when it comes to their art, there are other places where their use of color reduces their sales appeal to a point that it's not even fair to the artist.

More than anything else, this guide will help you decide how to refine your colors for specific items that you craft for sale, for patterns, or other creative endeavors so that from start to finish your customer will identify with your business -- and it's all because you've used color professionally.

3.17.2014

Sustainable Gardening: What to Plant, and Where to Plant It

Yes, I still live deep in the Colorado Rockies where even Spring is a light far, far, far away.

That doesn't mean I can't plan.

Whether gardening is your great passion or a form of decoration you'd rather take care of itself, sustainable gardening is a topic you should be interested in. What you plant - and where you plant it - can save the planet.

A featured Yahoo article, this guide will help you determine when it's safe to plant your sproutlings and - much more importantly - introduce you (or give more information on) sustainable gardening. This is a huge topic that you should address now. Right now. Even if there's snow on the ground, you can plan too. If spring is starting to show its signs, definitely get going!

It may sound silly, but the plants you choose can have such a huge impact on not only your living space but your local community and environment in ways that can affect everything for better or worse. Imagine ... a field of squash to feed an entire community. Or the introduction of an invasive species that grows so fast it kills everything in sight, like Kudzu.

The choice is yours - be green, be wise, and help us all make a better future.

Plants native to your region will always be a better, more sustainable choice than trying to force something to grow where it's not suited - and sometimes not wanted - wasting water and sometimes becoming so invasive as to cause damage.

3.14.2014

DIY Victorian Wedding Bouquet: The Blushing Blue Bride Bouquet

When Yahoo first approached me about writing a guide on creating your own wedding bridal bouquet, I was terrified. My first wedding was very Celtic down to a handfasting ribbon so there were no bouquets - roses were handed to the women in attendance instead!

But I so wanted to do this. It was a challenge. And it involved flowers. So after some research, I came up with several designs and the one I was most proud of and am sharing today was the Blushing Blue Bride Bouquet. It does have a companion article for the bridesmaid bouquets and for boutonnieres that I just had to write because the bouquet deserved beautiful accompaniment.

Why my favorite, you might ask? Because this bridal bouquet can incorporate everything, as a recent gift of this bouquet to one of my best friends for her wedding revealed. Remember the old saying: Something Old, Something New, Something Borrowed, Something Blue. So for this version, I incorporated the beautiful blues in flower choices as described in the article, used vintage lace ribbon (it took several layers to fully cover the background) for something old, and wrapped a necklace that I consistently wear given to me by my boyfriend as something borrowed. Something new? Well, the creation itself is new - so are every pin, every flower, and every grin you'll receive.

In this article, we're going to design the Blushing Blue Bride Bouquet and I'll lead you from start-to-finish in the creation of a Victorian DIY bouquet you'll treasure for years to come.

The finished bridal bouquet in the specific arrangement I chose.

The corsage pins used to attach the ribbon create a fantastic look - make sure they're spaced evenly, though.

These Victorian boutonniers and bridesmaid bouquets will make a splash with their elegant simplicity and grace.


3.13.2014

Learn to Crochet: Continuing the Shell Washcloth

Oh my gosh how far you've come! No, really, give yourself a pat on the back. You've hit the point that there is nothing to teach you but to help continue breaking the pattern down for you.

Just to refresh, this is the 4th post in the Learn to Crochet series and you should now know how to create the Foundation Chain, Chain (ch), Single Crochet (sc), Half-Double Crochet (hdc), and Double Crochet (dc). You've also learned how to read the * asterisks * that indicate a row repeat, how to [ read between the brackets { even when they contain confusing looking stuff} for easy reading ] and how to work around stitches. This is better than beginner level stuff we're talking about here. 

We're using the White Shells Crochet Washcloth from the Shell Washcloth Duo pattern for this part of the series so that you can learn crochet easy, fun, and wind up with a product you're going to love using.

The Shells Washcloth Duo Pattern is Free, published on Yahoo! and copyright to Phebe Durand


So in this post of the Learn to Crochet series I simply have the next parts of the pattern and its breakdown. Nothing fancy - but once you've finished these rows, you've only got two steps until you're finished with a boutique style crochet shell washcloth at a fraction of the cost and a huge boost to your ego credit bank.

The Instructions:

Row 3: Chain 3, [2 double crochet, chain 1, {single crochet, half-double crochet, double crochet} over side of 3rd double crochet].*Single crochet in the next chain 1 space, shell in the next single crochet. Repeat from * across to last stitch, working 3 double crochet in the last stitch of row.
Row 4: Chain 3, *Shell in the next single crochet, single crochet in the next chain 1 space across. Double crochet in the last stitch of row.
Rows 5-11: [Repeat rows 3 & 4] 7 times.

So you don't have to go searching, the pattern for the shell is:

Shell: [3 dc, ch 1, {sc, hdc, dc} over side edge of 3rd dc in 3 dc group] in indicated stitch. 

Alright, so if you've been following along with the exercises you should be able to move from one row to the next with absolute ease. If not, just be patient with yourself and begin at the start of the Shell Washcloth Duo pattern for the White Shells Crochet Washcloth. This is the pattern we're using for the first steps in learning how to crochet. If you're unsure of how to perform these steps, simply jump back to the Foundation Chain entry in the Learn to Crochet series and continue from there.

Let's switch up how we dissect rows now that we're really getting the hang of things. We're going to read each row as it's written, but spelled out fully with explanations so that you can easily compare.

Row 3: Chain 3. [double crochet in each of the next 2 stitches (2 dc), then chain 1. Insert the hook around the side of the 3rd double crochet (dc) and do a single crochet (sc), half-double crochet (hdc), and double crochet (dc) all around that post.] *Now we move into the row's pattern repeat that starts with a single crochet (sc) in the next chain-1 space of Row 2 (usually referred to simply as 'the previous row') and work a shell into the next single crochet (sc).* Repeat from * across to the last stitch, and work 3 double crochets (dcs) into that last stitch of the row.

Row 4: Chain 3. *We're immediately doing the row's pattern repeat by working a shell into the next single crochet (sc) and skipping over to the next chain 1 (ch-1) space where we're going to work 1 single crochet (sc) across. Since it says 'across' there is no second * asterisk in the pattern. It is assumed you will know to just repeat based on the wording. Now, we work a double crochet in the very last stitch of the row.

Rows 5-11: [We're starting off with brackets because the end of this part of the directions are in numerals, so it is much easier to read than it would be without them. All that we're going to do is repeat rows 3 and 4] seven times. This leaves us with 11 rows done and a nearly finished washcloth - just feel its exfoliating goodness! 

I am not including an exercise with this lesson for 2 reasons: 1) it will take you a little bit to get the shell stitch worked out and to create all 11 rows. Not a lot of time, but a little bit, and 2) because you may want to make a set of these washcloths. 

Try making them in sets of 3 at a time so that you can work up to the traditional set of 6 washcloths, either in matching or contrasting colors to match your bathroom's color scheme. Just leave each one at this point of 'finished' so that you can easily take the next to steps to wrap them all up and start using the lovelies!

3.12.2014

The Complete Guide to Quilt Pattern Size

Toesies in the cold are definitely not the height of luxury! Even if the lil ones are cute.

There is a bit of math involved in the answer, but I promise that taking the time to do the math will help you create quilt patterns that fit every single time and look like they were tailor-made.

Now look, I realize that not everyone is as OCD as me about having a perfectly sized quilt. My thought on the matter is simple: I want to surround myself with luxury so if I'm making it, I'm making it right.

It really only takes a few extra steps and I've provided the precise formula so you can just plug your measurements in and come out with the size of quilt you need for perfect luxury.

Oh yeah .... want to see how to do it? Your guide to sizing the perfect quilt.

3.11.2014

Learn to Crochet: The Double Crochet Stitch (and what brackets symbols mean)

If you've been following along in this learn to crochet series, you should feel comfortable with the Foundation or Beginning Chain, and the Single Crochet Stitch. You need to at least feel comfortable working single crochet into the foundation chain, which was covered in the last Learn to Crochet post.

Hopefully you took it a step further and went ahead to learn how to chain, turn, and continue going on because it will take you leaps forward. But don't panic if you didn't. You're fine as long as you meet the knowledge mentioned above.

The major thing to keep in mind for the Double Crochet Stitch is that when you chain to turn your work, as shown in the Single Crochet in the Chain lesson, you will need to chain (ch) 2 instead of 1 in order to keep your work the right height as you continue on.

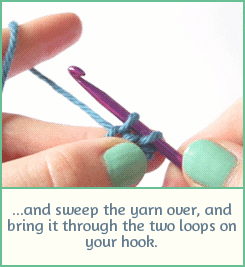
Using the incredible and amazingly inspirational Crochet Gifs tumblr, we will first look at a visual blow-by-blow of how to do the double crochet stitch.


http://crochet-gifs.tumblr.com/post/50191588268/learn-to-crochet-crochet-gif-tutorials-the

We're still going in order of the stitches you need to learn to successfully and confidently crochet, so you should at this point know how to create a foundation chain and work single crochet. Now we're adding double crochet to the knowledge base you're building.

In patterns, a Single Crochet Stitch is abbreviated as (sc), and a Double Crochet Stitch is abbreviated (dc). A chain is abbreviated (ch).

We're going to continue dissecting an actual pattern created for beginners so it contains no abbreviations. The pattern we're using is the Shell Washcloth Duo - beginning with the 'easier' of the two washcloths.

http://voices.yahoo.com/shell-washcloth-duo-softly-textured-crochet-washcloth-217213.html?cat=7


If you have followed along, you should have the foundation chain and Row 1 complete. If not, make sure you complete it before continuing on. The instructions for these are as follows:

The Instructions:

    White Shells Crochet Washcloth

    With yarn color of choice (white in the example) and size F crochet hook, chain 31.

    Row 1: Single crochet in 2nd chain from hook and in each chain across. (30 sc)

If the instructions look like Greek to you, just take a deep breath and head back to the Foundation Chain lesson. You'll quickly catch on to the chain and can move to the Single Crochet Stitch that is required in Row 1.

Now, let's continue from where we left off and look at the next set of instructions for the Shell Crochet Washcloth pattern. Remember that you can bookmark the page or even mail it to yourself if you want to have it on hand for practice and to follow along with. In the crochet lesson pieces, we'll only cover specific aspects of the pattern in order so that you can continue after practicing what you've just learned.

Looking at the next Row, we find the instructions:

Row 2: Chain 3, skip 1 single crochet, single crochet in the next single crochet. *Skip 1 single crochet, Shell in next single crochet, skip 2 single crochet, single crochet in next single. Repeat from * to the last 3 stitches. Skip 2 singles, double crochet in the last stitch. Turn.

Alright, what kind of witchery is this? What shell? Skip stitches? And what * are these things * ?

First, we're missing an essential part of the pattern, which actually lists how to do the Shell. When specific stitch sets are repeated often throughout a pattern, they are usually explained how to create them at the very beginning of the pattern - before the instructions - as is the case here. If you have the pattern bookmarked, you can reference the Shell there, or check it out here. It says:

Shell: [3 dc, ch 1, {sc, hdc, dc} over side edge of 3rd dc in 3 dc group] in indicated stitch.

Okay. So we just take note of that for the moment. Now, what is a skip? Exactly what it sounds like, and exactly what you've been doing every time you insert your hook into a new row. You simply continue working past the number of stitches it says to skip - so just skip them and keep going.

Finally, the conundrum: what do the brackets like [ this ] and { these } mean? Glad you asked! They're a really simple tool that helps you read the pattern without it running on for pages. Instead of telling you to perform a specific stitch over and over and over again, everything inside the brackets need to be repeated as stated in the pattern. I know - believe me, I know that the Shell still makes no sense yet. Bear with me.

Let's dissect this Row in the pattern now.

We begin with a Chain 3. This pattern does not but many patterns will explain exactly why you're being asked to chain the number you are - if you are asked to chain 2, you can usually assume that it is a single crochet, if you chain 3 it is a double crochet, and if you chain 4 it is a triple crochet that the chains represent.

So, pattern - chain 3, skip the first single crochet in line, and single crochet in the next one. This is how we start the row but will not continue it, indicated both by the period and the symbols that immediately follow it.

No cringing at the * asterisk * symbols now. Everything inside * this and * that need to be repeated. That's it. Brackets ... These are a way of organizing the pattern directions cleanly. So everything inside [ this bracket and ] that one are a single set of directions that help you read more clearly. Sometimes they are inserted in really difficult patterns for rows because the instructions for a single row would seem insane without them.

Looking right inside the brackets, then, we start with 3 double crochet and a chain when we hit the other brackets that look like { this }. When you run into these brackets, they are another way of setting a single series of instructions into the larger picture without using tons of words. So after you have chained 1, slip your hook around the side of the 3rd dc that you just made and do a single crochet, half-double crochet, and a double crochet around it.

OH NO. HOW to do do a half double?! Okay no panicking. I'll have an animation soon but for now, simply refer to the double crochet animations above. You do a half double crochet stitch exactly the same way except that you yarn over once and pull the yarn through all 3 loops on the hook immediately instead of repeating. Easy. Try it.

With your shell made, it's time to continue. The instructions say to skip 2 single crochet and make a single crochet in the 3rd (next single crochet). Easy peasy - go for it.

Now you just need to repeat everything inside * these * asterisks until there are only 3 single crochet left. Go for it, taking your time to make skips and stitches even and not-too-tight. Once you reach the last 3 single crochet stitches, skip 2 of them and work a double crochet in the last one.

Through this row you should notice how shells and stitches 'stand up' a little bit when stitches are skipped. This is because when you work several stitches into a single stitch but want to wind up with the same number of stitches you started with in the previous row so that your work doesn't get wider, you need to 'make up' for what you've added. By skipping stitches, it makes up for the extra by subtracting the same number. What happens, then, when you make the next stitch is that the 'extras' are pulled into alignment.

And with that, we're done with the next part of the Shells Washcloth. 

Oh, would you like another exercise? I really, really hoped you would! This one asks you to practice the 3 stitches you have learned, but in a regular pattern format so you need to use your abbreviation deciphering skills. Again, what you end up with is a pattern swatch that is similar to ones you create to check your gauge or create 'sampler' afghans and it will prepare you for the next step of the Shells Washcloth pattern.

Exercise Swatch 1:

With yarn color of choice and a size G/6-4.25 MM steel crochet hook, chain 41.

Row 1: Sc in 2nd ch from hook and in each ch across (40 sc)

Row 2: Ch 3 (counts as 1st dc now and throughout). Dc in each of next 4 sc. *Sk next sc, dc in each of next 5 sc* across to last 5 sc. Dc in each of last 5 sc. (16 dc, 5 sk)

Row 3: Ch 1 (counts as 1st sc now and throughout). Sc in each dc and sk space across. (40 sc)

Row 4: Repeat Row 2.

Row 5: Repeat Row 3.

We will cover nice 'Finishing Off' soon. For now, when you're done with a swatch, simply make a slip knot and cut the yarn about 3" from the slip knot, leaving a tail.

3.10.2014

Victorian Pineapple Crochet Coaster Pattern

Pineapple crochet patterns are seriously fun because you know they'll turn out beautiful. Let's incorporate the beauty of pineapple crochet in your home - on dainty looking but serious working coasters.

This is seriously just the first of more to come in the arena of coasters. As I continue working on the remodel of Luxe Domestique (ohhh I'm dying to show off some of the projects but they're not quite ready to do so yet!) I've been obsessed with the silly task of picking the perfect serving set. You know, the whole matching placemats and napkins and coasters thing ... there will be chopstick envelopes too because it fits in with our plans. The problem is deciding which pattern is exactly the one I want.

So in the meantime I'm creating coaster sets in my black and white base colors for the house and am keeping them carefully stored dust-free until I can decide.

And you get to benefit from my inability to decide on which coaster I want to crochet! This is the first in what I can't even begin to estimate will be the number in the series. Look out all dear friends who are moving ... you're about to have housewarming gifts!

I tried to hold this in the light where the pineapple clusters show off in a bloom.

The bloom shows better here. You can choose matching or contrasting borders, fronts, and backs to these coasters.

Since they're made in thread, these coasters are double-thick but you hardly notice.

In use with one of my favorite glasses and tea lovingly made by my daughter. What would I do without her?

3.08.2014

Learn to Crochet: Single Crochet in a Foundation Chain (and how to chain and turn to begin a new row)

Once you feel comfortable with the beginning or foundation chain, you're ready to graduate to the single crochet stitch. This is a nice, tighter stitch that can be created in large portions to create a thick 'fabric' from the yarn, or as part of a design both to accentuate and build the crochet piece.

Later on, when you are working with a large piece as shown below, you will need to chain 1 time and turn your work to create a single crochet. After chaining 1, you will slip your hook into the 2nd stitch closest to your hook and then in each stitch across your chain, or as a pattern indicates.

http://crochet-gifs.tumblr.com/post/48372067411/learn-to-crochet-crochet-gif-tutorials


Right. So if we're following in order of easy stitches and ones it's absolutely necessary to know, the Single Crochet Stitch comes second only to the Foundation Chain or Chain Stitch.

In patterns, a Single Crochet Stitch is abbreviated as (sc).  Remember from the Foundation Chain Lesson that a Chain is abbreviated as (ch).

Let's look at the beginning of a pattern using just the foundation chain and its first row of single crochet, and dissect what you're being asked to do.

What we'll be doing in the next few posts of Learn to Crochet is work on pieces of actual patterns to learn your stitches while you actually create something.

To begin with, we will be working with the Shell Washcloth Duo pattern. You can bookmark the page or even mail it to yourself if you want to have it on hand for practice and to follow along with. In the crochet lesson pieces, we'll only cover specific aspects of the pattern in order so that you can continue after practicing what you've just learned.

Shell Washcloth Duo Pattern, Published on Yahoo!, Copyright Phebe Durand
Taken straight from the Shell Washcloth Duo pattern page, you're asked to crochet the following instructions. Keep in mind that this pattern has been written for the beginner so contains no abbreviations. We'll get to them soon enough.

The Instructions:

White Shells Crochet Washcloth

With yarn color of choice (white in the example) and size F crochet hook, chain 31.

Row 1: Single crochet in 2nd chain from hook and in each chain across. (30 sc)

At first glance, this may look a little strange so let's break it apart. 

First, obviously, you're given the specific name of the pattern you're embarking on. The second thing to note is yarn color. Let me share a not-so-secret secret ... you're never stuck with a yarn color. Even if a pattern calls for a specific color of a specific yarn, you can choose the color you like and even a different brand of yarn if it is the same type as the yarn called for. In these examples, Caron Simply Soft is used. So you can choose your yarn color and type based off of this information ...

The next thing to note is the crochet hook size. When we get into reading full patterns, much of this information will come before the instructions themselves. For now, we just need to note that the hook called for is a size F. 

So we've got the basics figured out: soft 4-ply yarn, and a size F crochet hook. Awesome.

Finally, our last note in the first line is that we start with a foundation chain (ch) of 31. In many patterns, this would read simply "ch 31". To get started, then, we use our chosen yarn and hook and create a foundation chain of 31 stitches.

Next, we see "Row 1:". Whether you are working in rows or rounds, each piece is broken into a single piece that is worked in rows (right to left) or rounds (from the center out). Rows are very straightforward - rounds will be covered separately because they can be done in so many ways.

In our first row, we are asked to make a single crochet in the 2nd chain from the hook and in each chain across. Broken down, this means that since we're working off of a chain, we don't need to chain 1 to turn our work. Instead, we skip 2 chains instead of the 1 chain we will create to turn in every other single crochet situation. So, place your hook through the 2nd chain (the 2nd V stitch) from your hook and create your first single crochet. The first one can be a little tricky - take your time and be patient with yourself. After that, continue on until you have reached the end. You should be able to count 30 distinctive "V" shapes.

Why 30 instead of 31? We started out with 31 in our foundation chain. There's a simple reason: we needed 1 chain to 'turn' our work. This leaves us with one less stitch than our original chain. You will always start out with at least 1 more stitch in your foundation chain than the number of stitches you end up with in your first row. Just make sure you count carefully.

As with the foundation chain, it is extremely easy to crochet your single crochet stitches too tightly. Remember that your hook should be able to slide easily back and forth. 

For practice, work the foundation chain and first row. Then, chain 1 and turn your work so that you can work from right to left again. Single crochet in every single crochet from the previous row. Repeat this 2 more times, which will leave you with 4 single crochet rows. Examine your work. You can tell where you crocheted too tightly because the row will be thinner than the rows above and below it. If you created too many stitches, you will notice a bulge at the end of your row. You should also be able to make out each of the "V" shapes created by the stitches clearly and they should also look even - if they're scrunched up you've crocheted too tightly, and if they're wide enough to look like a "U" you've crocheted too loosely. Practice this swatch until you feel comfortable with the single crochet process. 

And want a cool hint? The practice work above is generally the same type of swatch you would need to create to make sure you have the right gauge (demystification to come!). So you're actually learning something extra without knowing it ... or you know it now but anyone who didn't get this far won't!

Just so you can get ahead of all the lazy ones who won't want to try the exercise above, I'll even share Crochet Gif Tutorial's tumblr entry on chaining and turning at the end of a row. Have fun!

http://crochet-gifs.tumblr.com/post/48715513283/learn-to-crochet-crochet-gif-tutorials-chaining

3.07.2014

Create, Print, and Frame! DIY Keep Calm And ... Poster Guide

"Keep Calm And..." Posters are easy and fun to make. Once you start creating them in Photoshop, you'll be eager to come up with the perfect phrase to print. This guide will take you through the whole process of creating and printing a "Keep Calm" poster.


Creating a Printable, Totally Enviable Keep Calm And ... Poster to Print & Show Off is SUPER easy.

Preferably you should have Photoshop or Photoshop Elements, but any graphics editor that will allow you to save your file at 300 d.p.i. (dots per inch) or p.p.i. (pixels per inch) will work.

And this is fun.

Just finish your sentence, feel super cool and creative while you make your poster, and make everyone grin at your genius when it's hung on your wall.

3.06.2014

Learn to Crochet: The Foundation Chain

When it comes to any sort of 'hobby' craft (even when I'm just playing with graphics, it isn't just a hobby), crochet rivals any other as being my favorite.

I was lucky enough to have a wonderful Grandmother who taught me how to crochet. Or tried, bless her. She was successful in teaching me how to do a foundation chain and turn for single crochet but I quickly lost the knowledge of how to do a single crochet (hey, I was pretty young). Later in life I was able to pick the art back up and was lucky enough to still have my Grandmother's patient help - even hurrying over when I had a yarn tension emergency - to reteach me the ways of crochet.

Learning crochet can seem mystifying. It doesn't have to be.

Pick up a single skein of whatever pretty yarn you like best (just get something inexpensive), a size F or G crochet hook, and start learning online!

I take absolutely no credit for the animated gif tutorials on learning crochet that I will be sharing. They have been created by and are fully copyright to Crochet Gifs on Tumblr. They are simply the most stunning way to learn crochet that I've yet found and when possible I will be continuing the collection with animated gifs that are either showing my hands or illustrated ... we'll see ;)

So. The most important stitch to learn and where you need to start: The Foundation Chain. This is where the largest number of crochet patterns you use will start.

First, Crochet Gif's beautiful work:


I love visuals. They help me more than almost anything else. Is there something better? Yup. Pairing visuals with good instructions.

Learning the Foundation Chain or Chain Stitch is the first thing you should get comfortable with when learning crochet. The real trick is to make sure that every time you pull your hook through a loop, as shown above, you don't tighten the loop made. If there is one common mistake beginners make, it's trying to crochet too tightly. What you want is to practice to the point that your loops (stitches) are even, evenly spaced, and that your crochet hook can easily slide in and out of each stitch without having to shove - or having it just slip right through. It's a fine line, but you can get there.

To create the foundation chain, you need to begin with a slip knot. Do not tighten your slipknot too much yet - your crochet hook needs to be inserted through the hole. With this done, pinch the slipknot between your thumb and forefinger and slide your hook though the loop to hook the yarn and wrap the yarn over the hook from the back to the front of the hook (this is called a yarn over and is often abbreviated YO). Not moving your fingers, draw the hook with its looped yarn back through the loop on your hook. Slide the new loop (stitch) to the shaft of your hook to complete one chain stitch.

Repeat this process: yarn over, hook and draw through the loop on your hook. You'll notice that you consistently rotate between 1 loop on the hook to 2 loops and back to 1 loop again with each stitch you make. 

Continue making chain stitches for as many as your pattern calls for - or, for practice, try doing them in sets of 40. This allows you to learn when the chain feels too tight or too loose. You will also be able to see where chain stitches are uneven. To fix this, you simply need practice.

Finally, let's talk about counting chain stitches in a foundation chain. Turn your chain so that the "V" shapes of the stitches are lined up along the chain. Do not count the slipknot or the loop that is still on your hook. Every "V" between the slipknot and the loop on your hook, though, is a single stitch. So if you're working 40 stitches, you should be able to count 40 "V" shapes when you're done with a set.


3.05.2014

Sleek Slouch Cap Crochet Pattern

One of the latest crochet patterns I've published on Yahoo, this one is epically cool. It's worked from the top down in the round without a single seam or join. You can go for a neat and tidy slouch or a long and deeply dramatic one using a simple note .... but I can't tell you what it is! You have to go check the pattern out for yourself.

Seriously, it's sleeeek for a slouch cap. It's everything you want a slouch cap to be and you don't have to spend serious bucks to get it.

Some cool variations I've thought of after making about a dozen of these in black (teenagers, man) would be to work stripes into the pattern or use a variegated yarn for an ombre sort of look. I'm also dying to try making a dramatically deep one with little bear ears coming off of it.

Share your creations :) I'd love to see what you come up with! Comment with a link if you like. Here's my lovely daughter being a great model for me with my 2nd hat.

This is a very 'tidy' version of the slouch cap, with a couple rounds omitted to keep the cap the way she liked it.

There is lots of positive ease on the finished garment so it can be tugged, jerked, pulled and generally twerked into exactly the slouchy shape you like.