I can't remember a time when I didn't love roses. They are the sight and scent of family, of comfort, and all things beautiful. That I have dozens of them comes as no surprise to anyone that knows me well.
What I didn't know was that my neighbor was jealous of my roses. He finally made his way cautiously over while I was trimming my roses back this spring and asked how I was able to make them bloom so profusely. I had to (awful of me) stare for a moment, taking in the question, before answering, "You have to love on them. Take care of them from spring to fall."
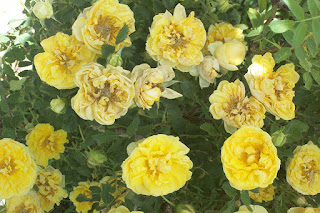
This guide shows how to properly trim your blooming roses (deadhead is the proper term for the process). Not only does it make for a healthier rose bush, but it encourages more blooms. The rose illustrated was wild when I moved in, and has since grown into a sprawling bush that literally drips with yellow roses. |
 |
First, it really is important to understand the reasons why we deadhead or "summer prune" our roses. It means the difference between a really twiggy rose and one with lots of foliage and beautiful roses.
The process of removing withered rose blooms throughout the summer is called dead-heading. If you don't dead-head your rose, it tells the bush one thing: the rose flower has done its job and no more work is needed until next season.
It's all about pollen. The rose flower exists to transfer pollen from one plant to another. If the bloom is pollinated, a hip will develop below the flower and produce seeds. This hip in turn will produce a hormone in the rose plant that says, "No need to bloom anymore."
In short, dead-heading our roses not only cleans them up but encourages more buds to grow and, over time, will result in a healthier plant with more foliage and larger flowers. |
|
 |
In many ways, I'm a traditionalist. And I don't apologize for it, since my roses definitely seem to love the method I use to dead-head - which is the traditional method.
First, locate the stem that your withering flower is attached to and close your pruning shears close to the stem. You're looking for one of three things:
- The first five-leaf set behind the rose.
- The closest to the bush you can get without cutting off buds.
- The closest curve off the stem close to the rose bush canes.
If you can find a five-leaf set, you're in the best pruning spot. You will prune right behind this leaf set. Some roses don't produce leaf sets or there are buds too close - don't worry, you'll just cut as close as possible to the bud. Finally, some roses, especially as they first begin to grow, will have blooms on short stems that come off the cane - the thickest part - of the rose bush.
No matter which category your rose bush falls into, trace the stem of your withering rose down to the point available to you.
|

 |
Once you've traced your stem back to the point at which you will prune, angle your pruning shears at about a 45 degree slant and make the cut quickly so that there is no "sawing". This prevents disease to your rose.
When your bush is newer or you are taking care of a wild rose (these typically have really, really spikey thorns in wild abundance, tiny blooms, and small leaves), you may want to cut your stem further back on the bush. Doing this encourages fewer but larger blooms - your rose bush is given the chance to concentrate on producing healthier, larger leaves.
Also to take into consideration while dead-heading your roses is how strong the stem is. Since the bush I'm illustrating is still semi-wild, it tends to grow more blooms than the stems can support - or, sometimes, it will just shoot out a stem that makes the bush look completely out of whack. Cutting closer to the cane in these cases will cause the bush to take longer to bloom again, but the health of your rose and the flowers it subsequently produces are definitely worth the sacrifice.
Regardless of the method or length, always cut at an angle. This is important to the overall health and growth of your rose. |


 |
Depending on how many roses your bush has, this process can take a while. Be careful to deadhead all wilting or just-about-to-wilt roses, though. When you're done, take a look at the overall shape of your bush and if it is out of shape (just doesn't look right, has some stems shooting out of nowhere, etc.), go ahead and sacrifice any blooms or buds to cut the stem back so that your bush is nice and tidy.
There is a benefit to this. You're causing the rose bush to focus on leaves. Leaves are what take in nutrients from the sun. So more leaves mean more roses. Win-win.
|
 |
By Fall, or when in your area the evenings start getting very cool, rose blossoms will start to fall off and leave behind rose hips. These hips can interrupt the next blooming cycle if they're not removed.
This is also the case during the summer, but it's not as easy to see the rose hip.
If you carefully wrap your fingers around the withering petals of a rose and slowly twist, the petals will fall off and reveal a fat, bulbous round on the end of the stem where the petals were. This is the rose hip. |
 |
Did you know that three average rose hips contain as much Vitamin C as a medium-sized orange? They do! And they make a lovely, faintly floral-flavored tea.
Rose hips are the fruit of the rose plant and are filled with tiny seeds. The food value - the source of the Vitamin C - is found in their skin. Some people find that they have a taste similar to an apple, but I find it to be more flowery than that.

If you're like me, the process of using the plants I grow is at least as fulfilling as growing them. With the abundance of rose flowers I receive, I never have a problem gathering enough hips to create tea - but you have to be careful to use the rose hips fairly quickly. The high concentration of Vitamin C in the hips is delicate. It will fade as you delay to use the hips, and if you use aluminum cookware and/or utensils to prepare the tea you will further deteriorate the Vitamin C content.
How To Make Tea:
- When Using Fresh: 1 to 2 TBS per cup of boiling water, steep for 10 minutes.
- When Using Dried: 2 tsp per cup of boiling water, steep for 10 to 15 minutes.
Tip: Don’t throw them out once they’ve been used to make tea, eat them after you’re done drinking the tea or add to soups or serve as a side at the supper table. They still have a lot of nutritional value even after they’ve been used in teas.
|

|


No comments:
Post a Comment
Your thoughts, comments, and suggestions are welcome! Please do not post spam - it will be removed.