6.10.2013

Dead-Heading Roses & Rose Tea

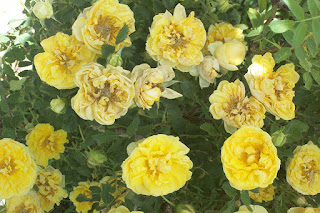
I can't remember a time when I didn't love roses. They are the sight and scent of family, of comfort, and all things beautiful. That I have dozens of them comes as no surprise to anyone that knows me well.

What I didn't know was that my neighbor was jealous of my roses. He finally made his way cautiously over while I was trimming my roses back this spring and asked how I was able to make them bloom so profusely. I had to (awful of me) stare for a moment, taking in the question, before answering, "You have to love on them. Take care of them from spring to fall."

This guide shows how to properly trim your blooming roses (deadhead is the proper term for the process). Not only does it make for a healthier rose bush, but it encourages more blooms. The rose illustrated was wild when I moved in, and has since grown into a sprawling bush that literally drips with yellow roses.
DIY: Dead-head Roses
Materials Needed:
  • A Rose Bush
  • A pair of dual-curve pruning shears
  • (optionally) Puncture-proof gardening gloves
How to Deadhead Roses
First, it really is important to understand the reasons why we deadhead or "summer prune" our roses. It means the difference between a really twiggy rose and one with lots of foliage and beautiful roses.

The process of removing withered rose blooms throughout the summer is called dead-heading. If you don't dead-head your rose, it tells the bush one thing: the rose flower has done its job and no more work is needed until next season.

It's all about pollen. The rose flower exists to transfer pollen from one plant to another. If the bloom is pollinated, a hip will develop below the flower and produce seeds. This hip in turn will produce a hormone in the rose plant that says, "No need to bloom anymore."

In short, dead-heading our roses not only cleans them up but encourages more buds to grow and, over time, will result in a healthier plant with more foliage and larger flowers.
Stages of Bloom
In many ways, I'm a traditionalist. And I don't apologize for it, since my roses definitely seem to love the method I use to dead-head - which is the traditional method.

First, locate the stem that your withering flower is attached to and close your pruning shears close to the stem. You're looking for one of three things:
  1. The first five-leaf set behind the rose.
  2. The closest to the bush you can get without cutting off buds.
  3. The closest curve off the stem close to the rose bush canes.

If you can find a five-leaf set, you're in the best pruning spot. You will prune right behind this leaf set. Some roses don't produce leaf sets or there are buds too close - don't worry, you'll just cut as close as possible to the bud. Finally, some roses, especially as they first begin to grow, will have blooms on short stems that come off the cane - the thickest part - of the rose bush.

No matter which category your rose bush falls into, trace the stem of your withering rose down to the point available to you.

Isolate Rose Stem

Once you've traced your stem back to the point at which you will prune, angle your pruning shears at about a 45 degree slant and make the cut quickly so that there is no "sawing". This prevents disease to your rose.

When your bush is newer or you are taking care of a wild rose (these typically have really, really spikey thorns in wild abundance, tiny blooms, and small leaves), you may want to cut your stem further back on the bush. Doing this encourages fewer but larger blooms - your rose bush is given the chance to concentrate on producing healthier, larger leaves.

Also to take into consideration while dead-heading your roses is how strong the stem is. Since the bush I'm illustrating is still semi-wild, it tends to grow more blooms than the stems can support - or, sometimes, it will just shoot out a stem that makes the bush look completely out of whack. Cutting closer to the cane in these cases will cause the bush to take longer to bloom again, but the health of your rose and the flowers it subsequently produces are definitely worth the sacrifice.

Regardless of the method or length, always cut at an angle. This is important to the overall health and growth of your rose.


Angle Your Cut

Angled Cut

Depending on how many roses your bush has, this process can take a while. Be careful to deadhead all wilting or just-about-to-wilt roses, though. When you're done, take a look at the overall shape of your bush and if it is out of shape (just doesn't look right, has some stems shooting out of nowhere, etc.), go ahead and sacrifice any blooms or buds to cut the stem back so that your bush is nice and tidy.

There is a benefit to this. You're causing the rose bush to focus on leaves. Leaves are what take in nutrients from the sun. So more leaves mean more roses. Win-win.
By Fall, or when in your area the evenings start getting very cool, rose blossoms will start to fall off and leave behind rose hips. These hips can interrupt the next blooming cycle if they're not removed.

This is also the case during the summer, but it's not as easy to see the rose hip.

If you carefully wrap your fingers around the withering petals of a rose and slowly twist, the petals will fall off and reveal a fat, bulbous round on the end of the stem where the petals were. This is the rose hip.
Gently Remove Petals to Reveal Rose Hip
Did you know that three average rose hips contain as much Vitamin C as a medium-sized orange? They do! And they make a lovely, faintly floral-flavored tea.

Rose hips are the fruit of the rose plant and are filled with tiny seeds. The food value - the source of the Vitamin C - is found in their skin. Some people find that they have a taste similar to an apple, but I find it to be more flowery than that.

Covered Rose Hips

If you're like me, the process of using the plants I grow is at least as fulfilling as growing them. With the abundance of rose flowers I receive, I never have a problem gathering enough hips to create tea - but you have to be careful to use the rose hips fairly quickly. The high concentration of Vitamin C in the hips is delicate. It will fade as you delay to use the hips, and if you use aluminum cookware and/or utensils to prepare the tea you will further deteriorate the Vitamin C content.

How To Make Tea:
  • When Using Fresh: 1 to 2 TBS per cup of boiling water, steep for 10 minutes.
  • When Using Dried: 2 tsp per cup of boiling water, steep for 10 to 15 minutes.

Tip: Don’t throw them out once they’ve been used to make tea, eat them after you’re done drinking the tea or add to soups or serve as a side at the supper table. They still have a lot of nutritional value even after they’ve been used in teas.
Rose Hip Tea

6.08.2013

Upcoming Projects

When beginning Curious Kitty, I simply had a need to share. Two days after starting, my computer went through a massive hard drive failure. Always fun. So ... I'm running a little behind where I wanted to be at this point.

With that in mind, I thought it might be nice to have a sneak peek at some of the projects currently in draft state. Keep in mind that the photos below represent the original project and won't necessarily represent what we create together. It's a sneak peek, after all :)


And there are some other things in the works, as well. Living in the Rocky Mountains, we have a few precious months of sunshine where construction can be done and this summer is overloaded with it. A total frame-off restore of the house, including windows, and interior remodeling are going on - most of it by the hands of myself and my family.

So you're going to get to learn with me some cool things like how to make a fold-away-desk on (yes, on) a bed, how to texture and fix drywall, and a myriad little projects like making trinket shelves and an entire walk-in art studio as part of a bedroom. Yup. Lots planned, so please bear with me when there are a day or two that pass with no posts. This blog is going nowhere - you're stuck with the Curious Kitty poking her nose in all corners of a Luxurious Life!

6.07.2013

Embroidery Basics: The Straight Stitch

The Straight Stitch is the most basic of all stitches, used both in hand sewing and embroidery. It is considered by many to be the most important stitch to learn and feel comfortable with first.

Knowing how to do a straight stitch is a fundamental. A total novice who has never held needle and thread in hand can create a straight stitch - and once you have the spacing down, you can use this single stitch to create a wide variety of effects in your embroidery.
Fashion DIY: Tutorial Name
Materials Needed:
  • A Needle (Any sewing needle will work but as you move on to floss you will need embroidery sewing needles)
  • Thread or Embroidery Floss
  • Printing Paper (for card practice) OR
  • Fabric and Embroidery Hoop
The materials above are for practicing the straight stitch using the Print & Practice Card provided. You can print as many copies as you like and practice until you feel comfortable. Then, you should move on to using embroidery floss and fabric. It is recommended that you use an embroidery hoop at this point, but not vital.
Print & Practice Cards are wonderful little tools that I love designing and teaching with. They allow you to practice the stitch with guidance before moving on the more scary-feeling thread into fabric.

So, first, open the image below by clicking on it. Then, right-click it and save it to your computer. Print it on printer paper.

Alternatively, capture your chosen fabric in an embroidery hoop.

Cut a length of thread or embroidery floss about 15 in. long. If using embroidery floss, carefully separate 3 strings from the length and pull them together from the skein.

 Standard embroidery floss has 6 strands of thread. Gently untwisting the thread will reveal the strands.

 
To unravel the strands for embroidery, separate 3 strands to one side and 3 to the other. Gently tug down the length so that the one thread turns into two. You will be working with one of these - set the other aside for later.

Thread your needle using the separated skeins or the thread you have chosen.
Gently tug your thread (or skeins, but we'll just refer to it as thread from here on out) so that you have about 2 in. on one side of your threaded needle and the remaining length tailing off it. At the end of the tail, create a simple knot to prevent the thread coming right through your fabric (or, when starting out, the Print & Practice Card).
To the left, about 2 inches of thread hangs loose. At the end of the other length, make a simple knot.


Bring your needle up from behind at Point A, the starting point, and pull until the knot stops gently at the backside. Move your needle forward and push back through the front to the back at Point B. Keep pulling until the thread is smooth and flat against the surface. Your needle and long length of thread will be at the back again. One straight stitch has been made.
Move your needle to the next Point A and push up, pulling the needle and thread toward you to the front of the surface again. Move the needle to the next Point B (keep going from left to right - don't go backward) and push through to the back again. Each time you pull the needle and thread to the front or the back, make sure that the thread lies flat against the surface. Two straight stitches have been made.
Straight lines of running stitch just keep on going from left to right.

Continue from left to right, up at Point A and down at Point B. Using the Print & Practice Card, you can see how each stitch should be as close to the exact same size as the one before it. When you have completed a line, wrap it around a stitch on the back side and knot it off.
First, slip your needle under the last stitch on the back.
Pull enough thread through that you have a small circle. Thread your needle through this circle and begin to tighten.
Once tightened, the knot will be secured around the last stitch made. Cut close to the knot.

The trick to different effects comes further down the card - your stitches don't have to be spaced the same width as your stitch itself. It is just the stitches that need to be uniform. Continue down the card - or practice on another one - until you're comfortable with the method.

Once you feel comfortable that you can make your top stitches even and the spacing between stitches uniform, try your hand at the Straight Stitch on fabric. An embroidery hoop isn't absolutely necessary, but using one will help you keep everything even and tidy.


6.06.2013

Friendship Bracelet Tutorial: Chevron Stitch

Every time I start a new friendship bracelet I have to giggle a little. As a young teen, these were all the rage and the more patterns you knew how to do from memory, the cooler you were. So totally.

As friendship bracelets come back in fashion (did they really ever go away, though?), I've received more and more requests from young and older alike on how to make the evergreen piece of jewelry. Ask, and you shall receive!

In this DIY guide, we're going to cover the straight-up traditional method of creating a friendship bracelet in a chevron pattern. There are more simple patterns ... but it really starts here if you're going for something more than one band of color after the other (and if that's what you're looking for, please leave a comment and I'll happily provide instructions on it, too!)
Friendship Bracelets Tutorial: The Chevron Stitch
Materials Needed:
  • A safety pin or piece of tape (something to hold your work tightly in place)
  • 2 colors of embroidery floss
  • A pair of scissors
The materials above are for creating a 2-color chevron friendship bracelet. If you want more colors, go for it! You will need 12 strands total, so that gives you up to 6 color choices.

Going old-school, I've assembled my chosen colors of embroidery floss (a dark gray and very light pink), a safety pin, and scissors. And for true old-school good measure, I've donned a pair of my most comfy denim jeans.

You can attach your project using tape, a safety pin, or a thumb tack - the idea is to keep the knotted strands secure. Some people will cringe when they see me pinning my jeans but it just feels so nostalgic. If you don't want to pin your jeans, you can attach the safety pin to a pillow.

So, beyond the materials ... let's get to the real 'first step'. You need 12 pieces of embroidery floss cut at about 15-20 inches. You should be able to wrap the length around your wrist 4-5 times. When using 2 colors of floss, it will take about 1/2 a skein to get this many threads cut.
This allows length for loose threads for tying, and won't make the bracelet too short when you're done whipping up the weave - what we call the chevron stitch.

Once you have your strands, tie them in a knot about 3 inches down and either tape to a surface or run a safety pin through them and stick it. Arrange the threads so that they are a mirror image of each other. This is vital in the chevron pattern (all patterns require a certain thread arrangement).

 
The colors I've chosen make it a little difficult to see, but the arrangement (from the outside to the center) is:
Left side: pink, gray, pink, gray, pink, gray
Right side: pink, gray, pink, gray, pink, gray
This makes a perfect mirror image with pink on the outside of both the left and right side and gray in the center.

When working a friendship bracelet, you will almost always start on the outside left. So, to start our chevron pattern, I will first knot my furthest to the left pink around the second strand in, which is gray.

Hold the second strand in tight and wrap the outside strand over and around it, pulling the end up through the center of the loop. Then gently tug it up the length of your floss until it reaches the knot. Repeat once more. Every time you knot over a thread, make 2 knots. This is important. It will move the outside thread into the second thread's position.

While we're on the knots, make sure that you really snug them up against each other. You don't want to pull so tight that they're not distinguishable, but if they're too loose or you make some tighter than others, the width of your finished bracelet will go in and out - the bane of beginners.
With your outside color, holding the second strand tight, make a 4-shape.
Loop the end of your knotting color over and behind the second strand, coming up through the center of the 4.
Once 2 knots are made on the second strand, it will swap places with the knotting strand and become the first, outside color.
Repeat Step 3 until you've reached the center of your strands (where 2 of the same colors meet - in my case, where 2 gray strands meet). You have made 1/2 of your chevron.
At this point, it's difficult to see the pattern in the image but you can see how the threads have swapped and your color arrangement should behave much better.


With 1/2 of your chevron made, it's time to create the second half. Start with your outside right strand, knot it twice over the 2nd right strand, and knot your way to the center. You're doing the exact same thing as before, but in reverse direction.
When your second half of the chevron is made, you will need to connect the halves. Do this by knotting the two (matching color - in my case pink) strands twice. Your first chevron is complete.
It's still a little hard to see, but your first chevron is complete once you've knotted the two center strands together.

Starting back at the left with your new outside color (gray for me), repeat steps 3 - 6. Continue doing so ... over and over ... making sure that you keep your color arrangement intact and you'll soon see something like this:

Continue working alternate colors until your bracelet is about 7 inches long (without the tie knot). This is the standard size for an 'adult' size wrist. When it reaches this length, knot it off tight against the last row. Then, to keep the ends from fraying, braid them and voila! Beautiful chevron friendship bracelet ready to wear.